The easiest way to take screenshots on a Chromebook is built-in tools of its own operating system. Taking a screenshot on a Chromebook is quick and easy, if you want to capture the entire screen, a specific portion or even a window. Chromebooks have built-in shortcuts and tools that help capturing and managing screenshots quickly. We will walk you through some methods on how to screenshot on Chromebook.

In This Page
Method1: How to Take a Full-Screen Screenshot
If you want to capture everything displayed on your Chromebook’s screen, follow these steps:
Keyboard Shortcut Method
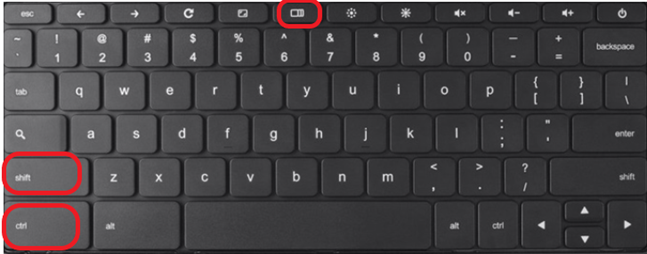
- Press Ctrl + Show Windows (🔲) at the same time.

- The screen will flash for a moment, indicating that the screenshot has been captured.
- A notification will appear in the bottom-right corner of the screen, allowing you to open or edit the screenshot.
- Your screenshot will be saved automatically in the Downloads folder under My Files.
Alternative Method (Using Quick Settings)
- Click on the Time at the bottom-right corner of your screen.
- Select the Screen capture option.
- Choose Full Screen and click anywhere to capture the screen.
This method is helpful if you prefer using the touchscreen or mouse instead of keyboard shortcuts.
Method 2: How to Screenshot a Specific Area of the Screen
Sometimes, you only need to capture a portion of your screen instead of the whole display. Here’s how:
Keyboard Shortcut Method
- Press Shift + Ctrl + Show Windows (🔲) simultaneously.
- Your screen will slightly dim, and your cursor will turn into a crosshair.
- Click and drag the crosshair over the area you want to capture.
- Release the mouse button, and the selected portion will be saved as a screenshot.
Alternative Method (Using Quick Settings)
- Click on the Time in the bottom-right corner of your screen.
- Select Screen capture and choose the Partial Screen option.
- Drag the selection box over the area you want to capture and click Capture.
This method is useful when you want to focus on a particular section of your screen without unnecessary details.
Method 3: How to Screenshot a Specific Window
If you want to capture only a specific window rather than the whole screen, follow these steps:
- Press Ctrl + Alt + Show Windows (🔲) at the same time.

- Your cursor will change to a camera icon.
- Click on the window you want to capture.
- The screenshot will be taken and saved in the Downloads folder.
Take a Screenshot in Tablet Mode
If you’re using a 2-in-1 Chromebook in tablet mode (without a physical keyboard), you can still take screenshots:
- Press and hold the Power button + Volume Down simultaneously.
- The screen will briefly flash, confirming that the screenshot has been taken.
- You can find the screenshot in the Downloads folder.
This method works similarly to taking a screenshot on an Android phone.
Where to Find and Edit Your Screenshots
Once you take a screenshot, it’s automatically saved on your Chromebook. Here’s how you can access and edit it:
Locating Screenshots
- Open the Files app from the app drawer.
- Click on Downloads under My Files.
- Your recent screenshots will be listed there.
Editing Screenshots
- Open the screenshot using the Gallery app.
- Click on the Edit button (pencil icon).
- Use the built-in tools to crop, rotate, or annotate the image.
- Save the changes after editing.
If you need more advanced editing, you can use online tools like Canva or Pixlr.
Read Also –
Computer Freezes Randomly?
Change Margins In Google Docs
How to Copy and Paste Screenshots
If you want to use your screenshot in an email, document, or chat, follow these steps:
- Open the Files app and locate your screenshot.
- Right-click on the file and select Copy.
- Open the app where you want to paste the screenshot (Google Docs, Gmail, etc.).
- Press Ctrl + V to paste the image.
This is helpful for quickly sharing screenshots without having to manually upload them.
Conclusion
Taking screenshots on a Chromebook is easy with keyboard shortcuts and built-in tools. Whether you need to capture the whole screen, a part of it or a specific window, you now know the best methods to do it efficiently.