If you’ve ever gone digging through your computer and realized some files seem to be missing, chances are they’re just hidden. Windows hides certain files and folders by default—usually system files—to prevent accidental deletion or editing that could harm your PC. But sometimes, you need access to these files. Whether you’re troubleshooting, cleaning up malware, or just want to dig into your system, this guide will help you reveal those hidden items in a safe and simple way.

Hidden files aren’t dangerous by nature. In fact, many of them are essential to keeping Windows running smoothly. However, Microsoft hides them to protect users from unintentionally messing with critical files. Still, there are plenty of valid reasons you might need to view these hidden files—and we’ll cover exactly how to do it on Windows 11, 10, 8, 7, and XP.
Let’s dive into each version step by step.
Show Hidden Files and Folders in Windows 11
Using File Explorer Settings
- Open File Explorer.
- Click on the View tab on the top menu.
- Hover over or click on Show, then select Hidden items.
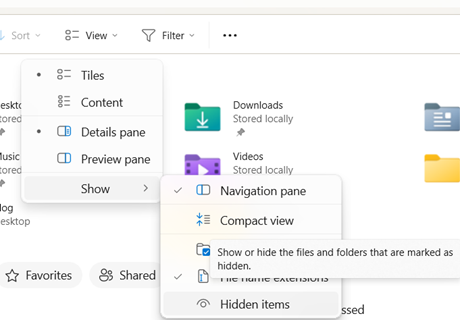
That’s it! Instantly, all hidden files and folders will appear in your current directory. You’ll notice they’re slightly faded out or ghosted compared to regular files—that’s your visual cue that they’re hidden.
This method is great for a quick view. But what if you want to see protected system files too?
Using Control Panel
If you prefer a more traditional method:
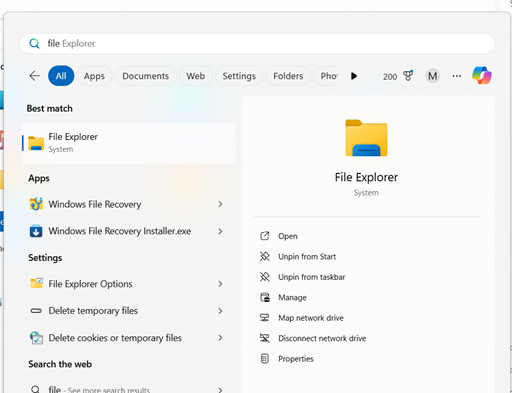
- Click Start, then type and open Control Panel.
- Navigate to Appearance and Personalization > File Explorer Options.
- Go to the View tab.
- Under Advanced settings, choose Show hidden files, folders, and drives.
- Click Apply, then OK.

This setting offers deeper control, especially for advanced users who want to view hidden files consistently across all folders.
Showing Protected Operating System Files
This step should only be done if you know exactly what you’re doing:
- Follow the above steps to get to File Explorer Options.
- In the View tab, scroll down and uncheck Hide protected operating system files (Recommended).
- Click Yes when the warning pops up.
- Apply and exit.
Now you’ll see not just hidden files, but even the ones Microsoft tries to keep deeply buried for safety. Proceed with caution here—messing with these files can lead to serious system issues.
Show Hidden Files and Folders in Windows 10
Windows 10 makes it just as easy, but the steps are slightly different depending on how you access them.
Through File Explorer Options
- Open File Explorer (Windows key + E).
- Click on the View tab at the top.
- Find and check the box labeled Hidden items.
Boom—instant visibility of hidden files. This method is often enough for most casual users.
Control Panel Method
For a more granular approach:
- Search for Control Panel in the Start menu.
- Navigate to Appearance and Personalization > File Explorer Options.
- In the View tab, select Show hidden files, folders, and drives.
- Click Apply.
This method ensures hidden files stay visible until you choose otherwise. It’s also a handy way to manage advanced file settings if you’re troubleshooting.
Showing Hidden File Extensions and System Files
To go deeper:
- In the same View tab of File Explorer Options:
- Uncheck Hide extensions for known file types (very useful for identifying file formats).
- Uncheck Hide protected operating system files (Recommended).
- Click Yes on the warning dialog.
- Click Apply, then OK.
With these options unchecked, you’ll have a complete view of your file system. Just don’t modify or delete anything unless you’re confident about what it is.
Show Hidden Files and Folders in Windows 8 and 8.1
Step-by-Step via File Explorer
Windows 8 introduced a more tile-centric interface, but thankfully, accessing hidden files is still pretty straightforward:
- Open File Explorer from the desktop or the taskbar.
- Click on the View tab in the top ribbon.
- Check the Hidden items box under the “Show/hide” section.
Once you check this box, hidden files and folders will immediately become visible. As always, they’ll appear slightly transparent to indicate their hidden status. This method is quick and perfect for one-time access to hidden files.
Using Folder Options in Control Panel
Want a more permanent setting change or deeper control?
- Open the Control Panel by right-clicking the Start button and selecting it from the menu.
- Navigate to Appearance and Personalization > Folder Options (or File Explorer Options).
- In the View tab, under Advanced settings, select Show hidden files, folders, and drives.
- Click Apply, then OK.
Using Control Panel gives you greater flexibility and control—especially if you’re an IT administrator or someone who deals with system-level file management regularly.
Displaying Protected Files and Extensions
Sometimes you need to go even further and view protected system files or file extensions:
- Still in the View tab of Folder Options.
- Uncheck the box for Hide protected operating system files (Recommended).
- A warning will pop up. Click Yes if you’re sure you want to proceed.
- Also uncheck the box for Hide extensions for known file types.
- Apply and save your changes.
This setup gives you a full view of all files and folders in your system, including extensions and OS-critical components. Be extremely cautious not to modify or delete these files unless you’re absolutely sure—they’re there for a reason.
Show Hidden Files and Folders in Windows 7
Windows 7 might be older, but it’s still used in many environments—especially in legacy systems or older hardware. Fortunately, accessing hidden files is almost identical to Windows 8.
Navigating through Control Panel
- Click the Start button, then open the Control Panel.
- Go to Appearance and Personalization, then select Folder Options.
- Head over to the View tab.
From here, you’re able to modify how File Explorer (called Windows Explorer in Windows 7) displays files.
Modifying Folder Options
- Under Advanced settings, scroll to find the option: Show hidden files, folders, and drives.
- Select it and then click Apply, followed by OK.
That’s all there is to it. Hidden files and folders will now be visible throughout your Windows Explorer sessions.
Enabling System File Visibility
For advanced users or those troubleshooting deep system issues:
- Go back to the View tab in Folder Options.
- Scroll down and uncheck the box for Hide protected operating system files (Recommended).
- Confirm your choice when prompted with the warning box.
- Also, consider unchecking the Hide extensions for known file types option.
Making system files visible in Windows 7 is especially helpful for manual malware removal or software cleanup tasks. But again, take extreme caution—deleting or editing the wrong file could make your system unstable.
Show Hidden Files and Folders in Windows XP
While Windows XP is mostly phased out, it still exists in specialized industries like manufacturing or legacy systems. If you’re working on an older machine, here’s how to expose those hidden files.
Classic Method via My Computer
- Open My Computer.
- Click Tools in the top menu bar.
- Select Folder Options from the drop-down menu.
- Click the View tab.
From here, you’ll be presented with various advanced settings that allow you to toggle visibility options.
Enabling System Files and Extensions
- In the Advanced settings list, select Show hidden files and folders.
- Uncheck Hide extensions for known file types.
- Uncheck Hide protected operating system files (Recommended).
- Click Yes when the warning prompt appears.
- Press Apply, then OK.
This will allow you to see all the hidden, extensionless, and system-critical files on your XP system. These settings were vital back when malware frequently disguised itself in hidden folders. Even today, it’s a useful trick when reviving an old machine.
Safety Precautions
Working with hidden files on Windows XP can be tricky. The system doesn’t have as many safeguards as newer versions. Always:
- Make a backup before modifying any system files.
- Use an antivirus or malware scanner to confirm file integrity.
- Avoid deleting files unless you’re certain they’re not required.
It’s better to err on the side of caution—especially on older systems that are more prone to instability.
Common Reasons to View Hidden Files
You might be wondering, “Why would I even need to see hidden files?” Great question. While most users can go about their daily computer tasks without ever needing to view these hidden elements, there are several legitimate reasons where accessing them becomes essential.
1. Troubleshooting Issues
When something on your system isn’t working as it should—like a malfunctioning program, corrupted settings, or unexplained storage space usage—hidden files can hold the clues. Many configuration files and logs are tucked away in hidden folders to avoid clutter, but they contain vital data needed for diagnosing problems.
For example, certain programs store temporary or cache files in hidden directories. If your software isn’t updating or keeps crashing, clearing out these files might solve the problem.
2. Malware Detection and Removal
Malware loves to hide—literally. Viruses and trojans often disguise themselves in hidden folders or system directories to avoid detection. If you’re manually removing malware (which should only be done if you’re experienced), accessing hidden files is crucial.
Security experts frequently need to inspect these hidden files to identify suspicious activity or leftover traces after an antivirus sweep. So if your PC is acting strange and scans come up clean, it might be time to take a look behind the scenes.
3. Manual Software Removal
Sometimes when you uninstall a program, it leaves behind remnants in hidden folders—settings, logs, or even leftover executable files. Over time, these add up and can slow down your computer or create conflicts with new software.
By viewing hidden files, you can completely clean up after an uninstall and keep your system tidy.
4. File Recovery Tasks
Ever accidentally delete or move something important? File recovery tools often recover data into temporary, hidden folders. If you’re trying to restore a file you thought was lost forever, you might need to look in these locations.
Keyboard Shortcuts and Quick Tips
Looking for faster ways to toggle hidden files? Here are some tech-savvy tricks:
1. Run Command
You can quickly open File Explorer Options by pressing:
- Windows + R → Type control folders → Press Enter
This takes you straight to the settings menu to toggle hidden files.
2. Command Prompt Method
To view all files in a directory including hidden ones:
dir /aThis command shows all files (including hidden and system ones) in the current directory when using Command Prompt.
3. PowerShell Usage
Want something more powerful?
Get-ChildItem -ForceThis PowerShell command lists all files, including hidden ones, in a folder. You can even use scripts to batch manage hidden files, which is great for IT professionals.
Using Third-Party Tools to Manage Hidden Files
While Windows offers built-in options to view and manage hidden files, third-party tools can often provide a more powerful, customizable experience. These programs go beyond just revealing hidden items—they allow bulk actions, better navigation, security features, and sometimes advanced recovery capabilities.
Here are some of the top-rated and trusted third-party apps:
- Everything by VoidTools
A lightning-fast file search engine that can reveal hidden files and folders instantly. - Wise Disk Cleaner
Helps clean up unnecessary hidden files like caches and leftovers from uninstalled apps. - FreeCommander
A dual-panel file manager that shows hidden and system files by default, offering better file control. - XYplorer Free
Offers tabbed browsing, advanced search, and full support for viewing and modifying hidden files. - Hidden File Finder by SecurityXploded
Designed specifically to detect hidden files, especially malware or suspicious content.
Conclusion
Being able to show hidden files and folders in Windows is a powerful skill—whether you’re troubleshooting, cleaning up your system, or just curious. We’ve covered step-by-step instructions for every major version of Windows—Windows 11, 10, 8/8.1, 7, and XP—along with advanced techniques using the command line, PowerShell, Registry, and third-party tools.
Just remember: with great access comes great responsibility. Hidden files are usually out of sight for a reason. So, explore wisely, back up frequently, and don’t delete what you don’t understand.
FAQs
1. How Do I Know If a File is Hidden?
Hidden files in File Explorer usually appear faded or slightly transparent compared to normal files.
2. Can I Permanently Show Hidden Files?
Yes, by adjusting settings in File Explorer or Control Panel, you can set hidden files to always display unless changed manually.
3. What If I Can’t See Hidden Files Even After Enabling the Option?
It could be due to user permissions, system corruption, or malware. Try resetting folder settings, checking permissions, or scanning your system.
4. Should I Be Worried About Hidden System Files?
Only if you modify or delete them. They’re essential for system operations. Look but don’t touch unless you’re sure.
5. Is It Safe to Use Third-Party Tools?
Yes, if you download from trusted sources. Always verify the tool’s reputation and avoid unknown or shady websites.