Safe Mode is a special diagnostic mode which Microsoft has built into Windows operating systems. It starts your computer with only the most essential system files and drivers. That means no third-party programs, no fancy display drivers and definitely no unnecessary background apps running. It’s like booting your PC with just the bare minimum needed to get it running.

When you start Windows in Safe Mode, you’re entering a cleaner version of your system—perfect for pinpointing what might be going wrong with it. If your PC is crashing, not booting properly or running too slow, Safe Mode can help you identify whether the issue lies with Windows itself or with something else you’ve recently installed. It’s also a great environment for running certain troubleshooting tasks like uninstalling problematic software, rolling back drivers or scanning for viruses without interference. It gives you control even when your PC seems out of it.
In This Guide
Why You Might Need to Use Safe Mode
Let’s be real—no one wants to use Safe Mode unless something is not correct. But when your computer is acting weird, Safe Mode becomes your best friend. Here are a few reasons you might want to jump into it:
- Startup Problems: If your PC crashes during startup or gets stuck in a boot loop, Safe Mode might let you in to fix things.
- Malware Attacks: Many viruses and malware programs are designed to avoid detection. In Safe Mode, they’re less likely to run, making it easier for antivirus tools to clean them up.
- Driver Conflicts: A faulty or incompatible driver can make your computer go haywire. Safe Mode lets you boot without loading these drivers, giving you a chance to remove or replace them.
- Software Conflicts: Sometimes apps clash with each other or with Windows itself. Safe Mode runs only essential software, so you can isolate and fix the issue.
- System Restore and Maintenance: It’s easier to roll back your system, delete unwanted apps, or tweak settings without distractions or conflicts.
Safe Mode is a powerful tool—especially when everything else fails. It won’t fix everything, but it’s the best place to start troubleshooting.
Different Ways to Boot into Safe Mode
Using the System Configuration Tool (msconfig)
This is probably the easiest method if you can still access your desktop. Here’s how:
- Press Windows + R to open the Run dialog box.
- Type msconfig and hit Enter.
- In the System Configuration window, go to the Boot tab.
- Under Boot options, check the box that says Safe boot.
- Choose the mode you want:
- Minimal: Regular Safe Mode
- Alternate shell: Safe Mode with Command Prompt
- Active Directory Repair: It allows administrators to repair, recover or restore the Active Directory (AD) database.
- Network: Safe Mode with Networking
- Click OK and restart your PC.

Next time your system boots, it will enter Safe Mode. Just remember to go back and uncheck Safe boot after you’re done troubleshooting or your PC will keep booting into Safe Mode every time.
This method is smooth and clean but only works if your system is already working well enough to get into Windows in the first place.
Using the Shift + Restart Method
Another method that works from the login screen or even from within Windows itself:
- Hold Shift on your keyboard.
- While holding Shift, click the Power icon on the login screen or Start Menu.
- Select Restart.
Your PC will reboot and show a blue screen with options.
- Click Troubleshoot > Advanced options > Startup Settings.
- Click Restart again.
- On the next screen, you’ll see a list of options. Press:
- 4 or F4 to enter Safe Mode
- 5 or F5 to enter Safe Mode with Networking
- 6 or F6 to enter Safe Mode with Command Prompt
This is super handy when your PC is acting up, but you can still get to the login screen.
Interrupting the Normal Boot Process
Can’t boot into Windows at all? Here’s a trick:
- Power on your PC.
- As soon as you see the Windows logo, press and hold the power button to force a shutdown.
- Do this 3 times in a row.
After the third forced shutdown, Windows will enter Automatic Repair mode.
- Choose Advanced options > Troubleshoot > Advanced options > Startup Settings > Restart.
From there, press the corresponding number to choose your Safe Mode type.
This method is more like sneaking in the back door when the front won’t open.
Command Prompt Method
If you can access Command Prompt, either from within Windows or from a recovery disk:
- Open Command Prompt as Administrator.
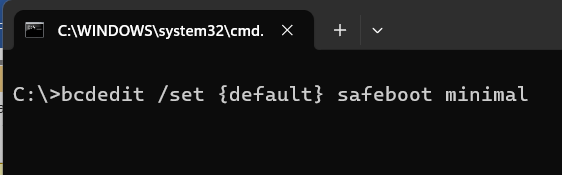
- Type the following command:
bcdedit /set {default} safeboot minimal- Press Enter and restart your PC.
It will boot directly into Safe Mode. To get back to normal, use:
bcdedit /deletevalue {default} safebootIt’s a power user move, but it works when other options don’t.
How to Start Windows 11 in Safe Mode
Step-by-Step Instructions
Windows 11 may look different, but Safe Mode works the same at its core. Here’s how to get into it:
- From Settings Menu:
- Go to Start > Settings > System > Recovery.
- Under Advanced Startup, click Restart now.
- Your system will reboot into a blue menu.
- Follow the Blue Menu Path:
- Click Troubleshoot > Advanced options > Startup Settings.
- Click Restart.
- On the Startup Settings screen, press 4 to boot into Safe Mode.
- From the Login Screen:
- Hold Shift and click Restart from the power icon.
- Follow the same Troubleshoot path as above.
- Using Command Prompt:
- Open an admin CMD window.
- Type: bcdedit /set {default} safeboot minimal
- Restart your PC.
Whether you use menus or commands, Windows 11 still respects the classic Safe Mode entry.
Tips and Troubleshooting for Windows 11
- Safe Mode Looks Weird: That’s normal. It uses a basic video driver.
- No Internet? That’s also normal in standard Safe Mode. Use Safe Mode with Networking if you need it.
- Getting Stuck in Safe Mode? Just uncheck the Safe Boot setting in msconfig or use bcdedit /deletevalue {default} safeboot to fix it.
How to Start Windows 10 in Safe Mode
- From Settings Menu
- Click Start > Settings (gear icon) > Update & Security > Recovery. Under Advanced startup, click Restart now.
- After the reboot, choose Troubleshoot > Advanced options > Startup Settings, then click Restart once more.
- When the system restarts, press 4 (F4) for Safe Mode, 5 (F5) for Safe Mode with Networking, or 6 (F6) for Safe Mode with Command Prompt.
- Using Shift + Restart
- At the login screen or within Windows, hold Shift while clicking Power > Restart.
- Continue with the same Troubleshoot > Advanced options > Startup Settings path and choose your Safe Mode option using the number keys.
- Using msconfig
- Press Windows + R, type msconfig, and hit Enter.
- Go to the Boot tab. Under Boot options, check Safe boot. Choose Minimal, Alternate shell, or Network depending on your needs.
- Click OK, then Restart. Your PC will boot into Safe Mode next time. To get back, return to msconfig and uncheck Safe boot.
- Interrupt Boot 3 Times
- Force shutdown during boot (press and hold the power button) three times. Windows 10 should trigger Automatic Repair, allowing access to Safe Mode via the blue screen and Startup Settings.
Common Issues You Might Face in Windows 10
- Safe Mode Keeps Restarting:
If Windows boots into Safe Mode but then keeps restarting, go into msconfig and ensure Safe boot is unchecked. - No Internet in Safe Mode with Networking:
Your network drivers may still be disabled. In Safe Mode with Networking, drivers get limited support. You may need to update your drivers after booting normally. - Stuck in Safe Mode Loop After Update:
Occasionally, Windows might get stuck if an update caused a launch into Safe Mode. Use the Command Prompt within Safe Mode and run bcdedit /deletevalue {default} safeboot to disable forced Safe Mode.
How to Start Windows 8 / 8.1 in Safe Mode
- From Advanced Startup Options
- Swipe in from the right (or press Windows + C), click Settings, then Change PC settings > Update and recovery > Recovery. Under Advanced startup, click Restart now.
- After reboot, choose Troubleshoot > Advanced options > Startup Settings, then click Restart again. Press 4 for Safe Mode, 5 for Safe Mode with Networking, or 6 for Command Prompt.
- Using Shift + Restart
- From the login screen or desktop, hold Shift and select Power > Restart.
- When Windows restarts, follow the same path through the blue boot menu.
- Using msconfig
- Windows key + R > msconfig > Boot tab. Check Safe boot and select your preferred mode.
- Restart and reverse it in msconfig after you’re finished.
Using Advanced Startup Options
Windows 8/8.1’s Advanced Startup menu unifies recovery tasks. Choose Troubleshoot, followed by Advanced options, then Startup Settings, to access Safe Mode choices. It’s user-friendly and flexible, but only accessible if your PC boots to the login screen.
How to Start Windows 7 in Safe Mode
- Use F8 Key During Boot
- Restart your computer. Just before the Windows logo appears, repeatedly press F8 on your keyboard (about once every second).
- The Advanced Boot Options menu will appear. Use the arrow keys to highlight Safe Mode, Safe Mode with Networking, or Safe Mode with Command Prompt. Press Enter.
- Using msconfig
- Once in Windows, press Windows + R, type msconfig, open the Boot tab, and check Safe boot.
- Choose the desired Safe Mode type, click OK, then restart.
When F8 Doesn’t Work
If the F8 method doesn’t bring up the menu—often due to fast boot settings—use msconfig or interrupt the boot 3 times in a row to trigger Startup Repair. From there, use Troubleshoot > Startup Settings to get into Safe Mode, similar to newer Windows versions.
How to Start Windows XP in Safe Mode
- Restart and Use F8 Key
- Reboot the system. When you hear the first beep, start tapping F8.
- A Windows Advanced Options menu should appear. Choose Safe Mode, Safe Mode with Networking, or Safe Mode with Command Prompt, then press Enter
Legacy Note
Just like Windows 7, XP relies fully on the BIOS-driven, pre-boot menu for Safe Mode. There’s no msconfig auto-boot toggle for Safe Mode in XP; everything is handled via F8 or external boot disks.
Types of Safe Mode
Safe Mode
This is the most basic form of Safe Mode. When you select this option, Windows starts with a minimal set of drivers and services. It doesn’t load any third-party software, network capabilities, or additional components. You’ll only get access to core system features like:
- File Explorer
- Control Panel
- Device Manager
- Event Viewer
This mode is ideal for basic system troubleshooting—like uninstalling software, disabling startup programs, or performing a system restore.
Safe Mode with Networking
This version of Safe Mode includes all the functionality of basic Safe Mode, plus the network drivers and services needed to access the internet or other computers on a network.
It’s especially useful when:
- You need to download drivers or updates while troubleshooting.
- You want to update antivirus software.
- You’re trying to search online for error codes or fixes.
But be cautious: enabling networking in Safe Mode can expose your system to security risks if malware is already present.
Safe Mode with Command Prompt
This mode opens directly into the Command Prompt instead of loading the regular Windows interface. It’s primarily used by advanced users who need to:
- Run command-line troubleshooting tools
- Manually move or delete files
- Access and repair the boot sector
- Restore critical files from backups
It’s very lightweight and bypasses the usual graphical interface entirely, making it effective for deep system repairs.
When Should You Use Safe Mode
Troubleshooting Startup Issues
If your PC won’t start properly or crashes before reaching the login screen, Safe Mode can help you identify if the issue is related to drivers, recently installed programs, or corrupted system files. You can:
- Roll back updates or drivers
- Use System Restore
- Remove recently installed software
- Run diagnostics without interference
Safe Mode gives you just enough access to get your system stable again.
Removing Malware and Viruses
Some viruses are tricky. They hide within your system and prevent antivirus software from running properly. In Safe Mode, most malware doesn’t load, giving you a better chance of removing it.
Steps to remove malware in Safe Mode:
- Boot into Safe Mode with Networking.
- Update your antivirus definitions.
- Run a full system scan.
- Remove detected threats.
- Restart in normal mode and scan again.
Safe Mode helps neutralize many forms of malware by stripping their ability to run at startup.
Fixing Driver Conflicts
Drivers are the bridge between your hardware and software. If a bad or incompatible driver is installed, it might crash your system or stop it from booting altogether.
Safe Mode loads only essential drivers. This means you can:
- Uninstall or roll back problematic drivers
- Install compatible versions
- Prevent automatic driver installations
If your system suddenly crashes after updating your graphics or audio driver, Safe Mode lets you undo the damage.
How to Exit Safe Mode
Restarting Normally
Sometimes, all you need to do is restart your computer. If you entered Safe Mode using F8 or the Shift + Restart method, a simple reboot will return your system to normal.
- Click Start > Power > Restart.
- Wait for your system to reboot.
- You should now be back in standard Windows mode.
Turning Off Safe Boot in msconfig
If you enabled Safe Mode using msconfig, your computer will continue to boot into Safe Mode until you change it back.
- Press Windows + R, type msconfig, and press Enter.
- Click the Boot tab.
- Uncheck Safe boot under Boot options.
- Click OK and restart.
This will restore your system’s normal boot sequence.
Additional Tips for Troubleshooting in Safe Mode
Use System Restore
System Restore allows you to roll back your PC’s state to an earlier point. This is super useful if a recent update or installation messed things up.
Run Antivirus in Safe Mode
Because most malware doesn’t load in Safe Mode, antivirus tools have a better chance of detecting and removing them.
Recommended tools:
- Malwarebytes
- Windows Defender
- Avast
Run full scans in Safe Mode with Networking for best results.
Check Device Drivers
If you suspect hardware issues:
- Open Device Manager.
- Look for any devices with a yellow exclamation mark.
- Right-click > Uninstall or Update Driver.
- Restart your system.
This can resolve problems caused by misconfigured or outdated drivers.
Safety Tips When Using Safe Mode
Backup Data First
Safe Mode is powerful but not risk-free. Always back up your data before making big changes like:
- Editing the registry
- Removing drivers
- Uninstalling critical software
Use a USB drive or cloud service to ensure your files are safe.
Avoid Making Major Changes
While Safe Mode is designed for fixing problems, avoid doing major system updates or BIOS changes in this mode. Save those for normal Windows sessions.
Safe Mode is a tool, not a fix-all environment. Treat it like a workshop—not a playground.
Tools That Help When in Safe Mode
Built-in Windows Tools
- System Restore: Roll back system changes
- Event Viewer: View detailed error logs
- Device Manager: Manage hardware drivers
- Disk Cleanup: Free up disk space
- Windows Defender: Scan for threats
Third-Party Utilities
- Malwarebytes: Malware scanning and removal
- Autoruns: View and disable startup programs
- CCleaner: Registry and junk file cleaner
- Revo Uninstaller: Advanced program removal
These can all be installed and used in Safe Mode with Networking.
Common Mistakes to Avoid in Safe Mode
Editing System Files
Unless you know what you’re doing, avoid tweaking or deleting system files. One wrong move could make your system worse, not better.
Skipping Backups
Never make major changes in Safe Mode without a backup. From driver changes to malware removal, things can go sideways fast.
Always play it safe.
Summary and Final Thoughts
Safe Mode is your go-to tool when Windows is acting up. Whether you’re dealing with startup failures, malware infections, or bad drivers, Safe Mode gives you a clean environment to isolate and fix the issue. From XP to Windows 11, the process has changed slightly, but the core idea remains the same: boot Windows with only the essentials.
It’s not just a troubleshooting step—it’s a lifesaver. Learn it, use it, and keep it in your tech toolbox.
FAQs
Is Safe Mode safe to use?
Yes, it’s completely safe. It’s designed to help fix problems—not create them.
Can I access the internet in Safe Mode?
Only in Safe Mode with Networking. Standard Safe Mode doesn’t load networking drivers.
What if Safe Mode doesn’t work?
Try accessing Safe Mode via recovery tools or bootable media. You may need professional help if even Safe Mode fails.
How long should I stay in Safe Mode?
Only as long as needed to diagnose or fix the issue. Then return to normal mode.
Can Safe Mode fix all PC problems?
Not all, but it’s the first step for many issues. Think of it as the place to find the fix.