Do you know, what is DNS or Domain Name System? It is just like a phonebook of the internet. It helps to translate human-friendly domain names (like www.example.com) into IP addresses that computers use to communicate on network.
Now lets assume that there is no DNS exists, you would have to memorize a set of numbers for every website you want to visit. Which is practically impossible for a human brain. DNS makes your online experience smooth and hassle-free.

You might have experienced a “DNS Server Not Responding” error in your device. It means that your computer or decvice isn’t getting a reply from the DNS server. This can be due to several factors like simple connectivity problems, software conflicts or sometime a hardware failure. You must understand the root cause before you dive into first step toward fixing it.
Understanding the Problem and Common Symptoms
You could see some of these when your DNS server isn’t responding
- Websites failing to load or taking too long time
- A complete loss of internet connectivity despite your connection icon showing active status.
- Intermittent connectivity issues that seem to resolve and then reoccur.
Causes of DNS Issues
There might be several factors which can lead to DNS problems, lets see some them –
- Router or modem malfunctions: Sometimes your Router or Moden just need a quick reboot.
- Incorrect DNS settings: Using an outdated or slow DNS server can be problematic.
- Software conflicts: Recent updates or incompatible software might interfere with DNS functionality.
- Malware or viruses: These can disrupt your network settings, leading to errors.
- ISP issues: Occasionally, the problem might lie with your internet service provider.
You must ensure that your router or modem is properly connected to the internet. To narrow down the troubleshooting process, you may test other devices in your home to see if they’re experiencing the same issue. If the problem is widespread, the issue might be with your network or ISP.
Detailed Solutions
let’s dive into some of the detailed solutions that can help you to fix the “DNS Server Not Responding” error.
Solution 1: Restarting Your Router and Modem
One of the easiest and most effective fixes is to restart your router and modem.
- Unplug both devices: Remove the power cables from your modem and router.
- Wait for 30 seconds: This gives the devices time to reset.
- Plug them back in: Start with the modem, let it fully boot up, then connect your router.
- Test your connection: Once both are running, check if your internet connection has returned to normal.
This method clears any temporary issues and refreshes the network connection.
Solution 2: Changing Your DNS Settings
Your current DNS server might be experiencing issues. Changing to a public DNS server can often resolve the problem. Here’s a step-by-step guide on how to do it on different platforms.
How to Change DNS on Windows
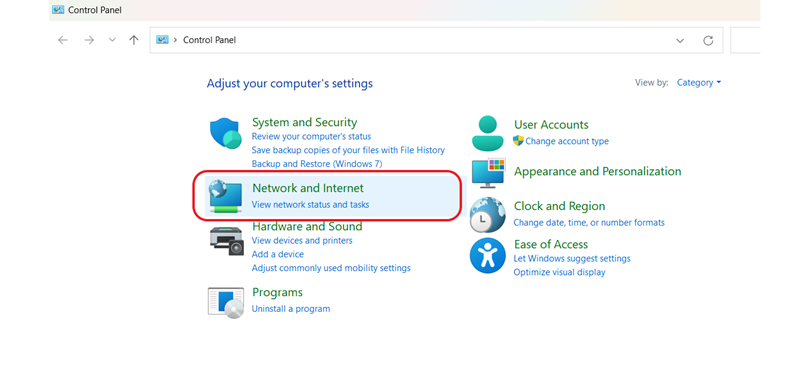
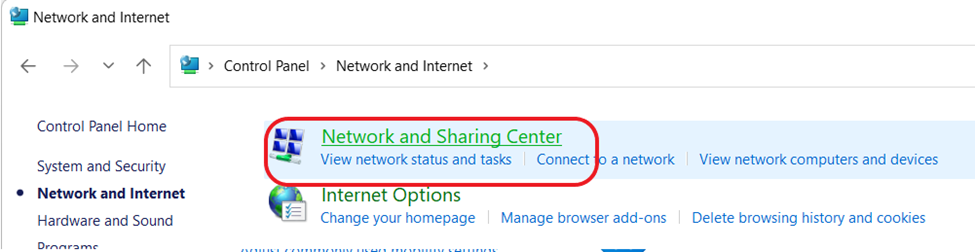
- Open Control Panel: Navigate to Network and Internet > Network and Sharing Center.
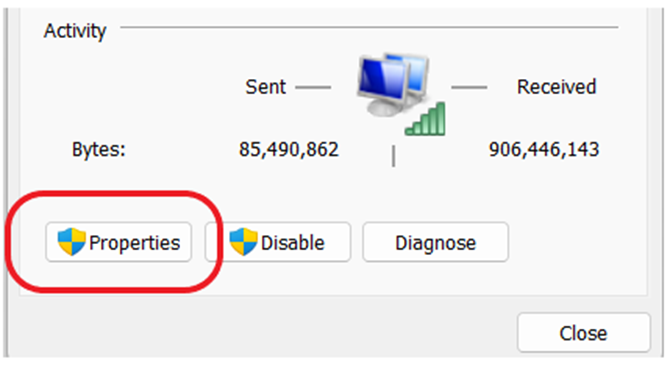
2. Change Adapter Settings: Right-click on your active network connection and select “Properties.”
3. Select Internet Protocol Version 4 (TCP/IPv4): Click on it and then choose “Properties.”
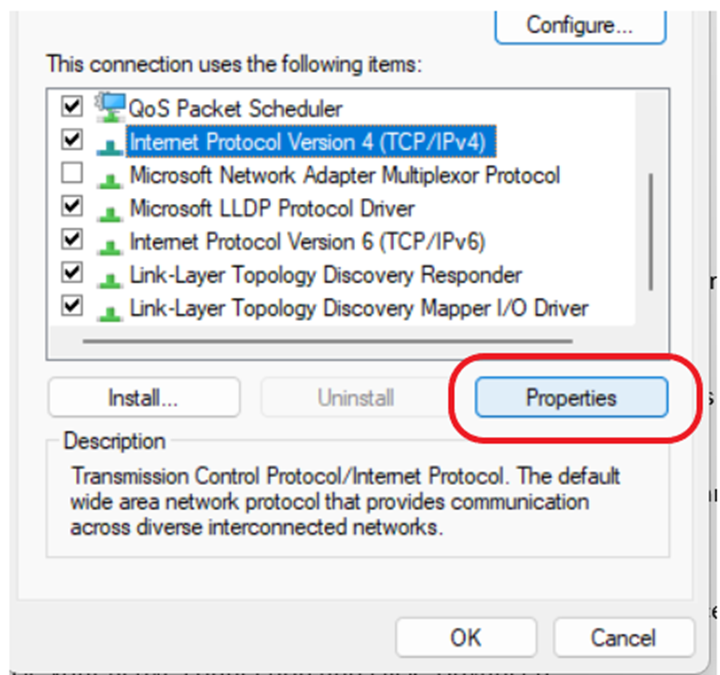
4. Use the following DNS server addresses: Enter a public DNS address like Google’s (8.8.8.8 and 8.8.4.4) or Cloudflare’s (1.1.1.1 and 1.0.0.1).
5. Confirm and restart: Click “OK,” then restart your browser or computer if necessary.
How to Change DNS on macOS
- Open System Preferences: Click on the Apple menu and select “System Preferences.”
- Go to Network: Choose your active connection and click “Advanced.”
- DNS Tab: In the DNS tab, click the “+” button and add your new DNS server addresses.
- Apply Changes: Click “OK” and then “Apply” to save your changes.
How to Change DNS on Mobile Devices
- For Android: Go to Settings > Network & Internet > Wi-Fi. Tap on your connected network, then click on “Advanced” and find the IP settings. Switch from DHCP to Static, and add your preferred DNS addresses.
- For iOS: Go to Settings > Wi-Fi. Tap the “i” icon next to your network, scroll down to DNS, and tap “Configure DNS.” Choose “Manual” and add the new DNS addresses.
Changing your DNS settings can significantly improve browsing speed and connectivity reliability, especially if your default DNS server is unreliable.
Solution 3: Flushing DNS Cache
DNS Cache is a temporary storage system which is used by your computer or network to save DNS lookup information. When you type a website address into your browser, your system sends a query to a DNS server to translate that domain name into an IP address. Once the translation is done, this information is stored in the DNS cache storage. If you visit the same website again, your computer can quickly retrieve the IP address from the local cache instead of making another request to the DNS server. This process speeds up your browsing experience and reduces network traffic.
The stored data in the DNS cache can become outdated or corrupted which might lead to “DNS Server Not Responding” error. In such cases, clearing the DNS cache can help resolve these problems.
Steps to Flush DNS Cache
- On Windows:
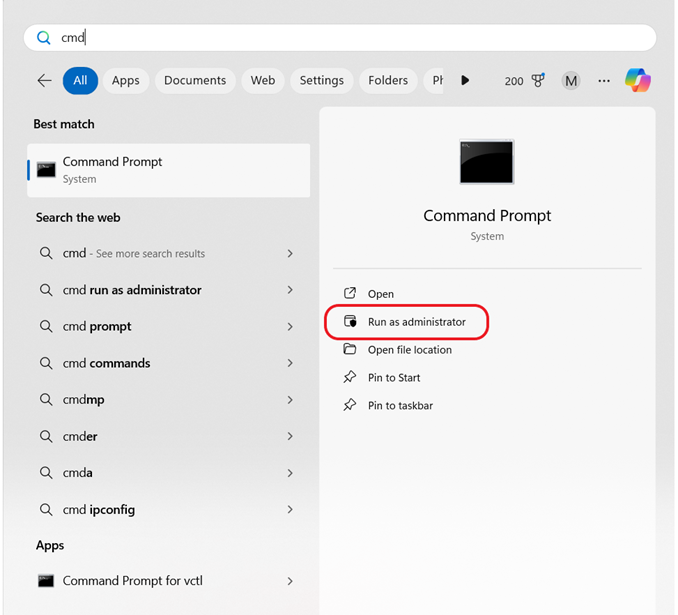
- Open Command Prompt as an administrator
2. Type ipconfig /flushdns and hit Enter.
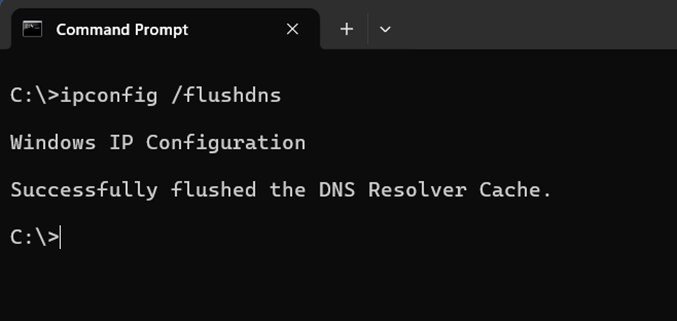
3. You should see a confirmation message indicating that the cache was successfully flushed.
- On macOS:
- Open Terminal.
- Type sudo killall -HUP mDNSResponder and press Enter.
- Enter your admin password if prompted.
- On Linux:
- Open Terminal.
- Depending on your distribution, type sudo systemd-resolve –flush-caches or restart the nscd service using sudo /etc/init.d/nscd restart.
Flushing the DNS cache helps eliminate any stale entries that might be causing connectivity issues.
Solution 4: Resetting TCP/IP and Network Settings
Resetting your TCP/IP stack can help clear up underlying issues that might be affecting your network connectivity.
For Windows:
- Open Command Prompt as Administrator: Right-click on Command Prompt and select “Run as administrator.”
- Reset TCP/IP: Type the following commands one by one and press Enter after each:
- netsh int ip reset
- netsh winsock reset
- Restart Your Computer: Once done, restart your computer to apply the changes.
For macOS:
While macOS doesn’t have a direct equivalent command, restarting your network service can help. Simply turning Wi-Fi off and then back on, or rebooting your system, can often serve the same purpose.
This reset helps resolve issues related to network protocols and can restore your internet connectivity.
Solution 5: Updating Network Adapter Drivers
Outdated or corrupted network adapter drivers can lead to DNS issues. Keeping your drivers updated ensures optimal performance.
Steps to Update on Windows:
- Open Device Manager: Press Windows Key + X and select “Device Manager.”
- Locate Network Adapters: Find your network adapter in the list, right-click, and select “Update driver.”
- Search Automatically: Choose the option to search automatically for updated driver software.
- Restart Your Computer: After the update, reboot your computer to complete the installation.
For macOS users, system updates typically include network driver updates, so ensure your macOS is up to date.
Solution 6: Disabling VPN and Proxy Servers
If you’re using a VPN or proxy server, they might interfere with your DNS settings. Disabling them can sometimes resolve the issue.
Steps to Disable VPN/Proxy:
- For Windows:
- Open Settings and navigate to Network & Internet.
- Go to the VPN or Proxy section.
- Disable any active connections or settings.
- For macOS:
- Open System Preferences and select Network.
- Choose your active connection and click “Advanced.”
- Go to the Proxies tab and uncheck any enabled proxies.
By temporarily disabling these services, you can determine whether they are the source of the problem.
Solution 7: Scanning for Malware or Viruses
Malware or viruses can tamper with your network settings and lead to DNS errors. Running a full system scan can help detect and remove any malicious software that might be interfering with your DNS.
How to Scan Your System:
- Windows:
- Use Windows Defender or another trusted antivirus program.
- Run a full system scan and follow the prompts to remove any detected threats.
- macOS:
- Consider using reputable antivirus software designed for macOS.
- Perform a full system scan and address any issues that are flagged.
Ensuring your system is clean can prevent recurring DNS issues caused by malicious software.
Final Thought
If you’ve tried all the above solutions and the issue still persists, it might be time to contact your ISP. Sometimes the problem is on their end – perhaps there’s maintenance, a configuration error, or a regional outage affecting DNS services. Explain the steps you’ve already taken, and they may be able to provide further assistance or insights.
There are several solutions available to help you get back online. Your internet connection is a lifeline in today’s digital world, so taking the time to understand and fix DNS issues is well worth. You should be able to troubleshoot and resolve most DNS problems on your own by following the above mentioned steps.
Suggested Read Update Windows Machine
FAQs
1. What is the primary role of DNS in my internet connection?
DNS translates human-friendly domain names into numerical IP addresses that computers use to communicate. Without DNS, navigating the internet would be a complex and error-prone process.
2. How often should I update my network adapter drivers?
It’s a good practice to check for updates every few months or whenever you experience connectivity issues. Regular updates can help ensure optimal performance and compatibility with the latest technology.
3. Can using a public DNS server improve my browsing speed?
Yes, switching to a public DNS server like Google’s or Cloudflare’s can sometimes improve browsing speeds, particularly if your current DNS server is slow or experiencing issues.
4. Is it safe to disable my VPN or proxy if I’m having DNS issues?
Temporarily disabling your VPN or proxy is safe and can help identify whether they are causing the issue. Just remember to re-enable them if you rely on them for security or privacy.
5. What should I do if none of the solutions work?
If none of the above steps resolve your DNS issue, it’s advisable to contact your ISP. They can provide further insights and check if there’s an issue on their end.